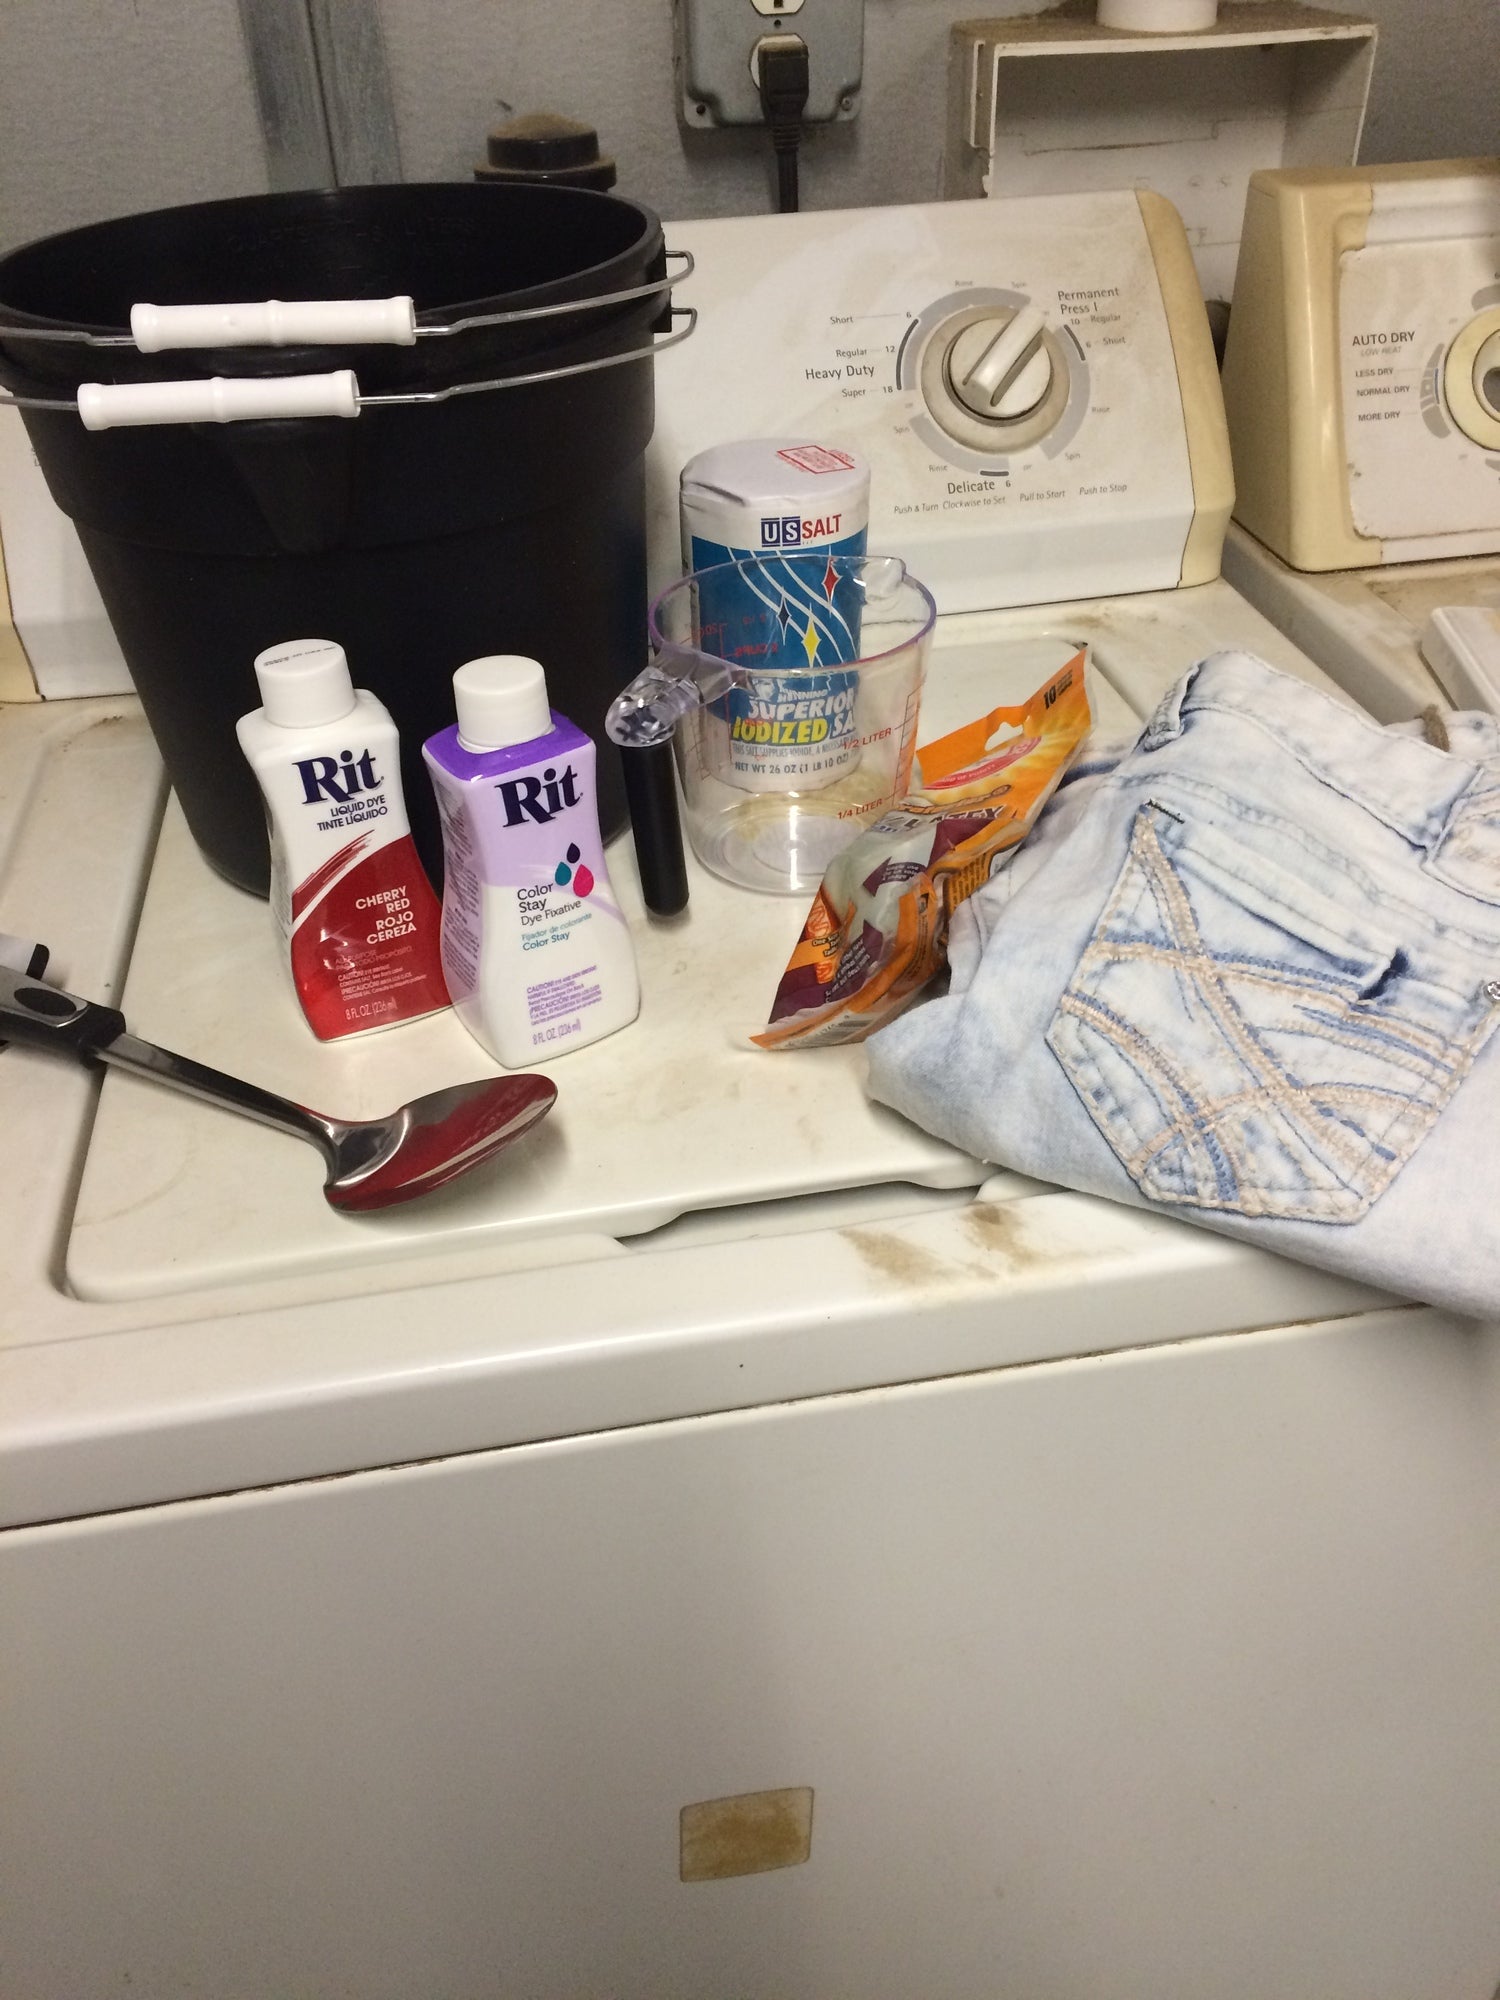
Ombré, French for “to shade”, is one of the hottest trends going into the summer, whether it’s jeans, nails or hair. If you’re ombré you’re in. The Utah Barrel Racing Association (www.utbra.com) spring 5D and Futurity held last weekend hosted a “Tie-Dye Friday” and rocking ombré jeans seemed like the perfect idea. Turns out, finding boot-cut ombré jeans in my size, off the rack was a major challenge. Skinny ombré pants ran upwards of $50, and finding a boot cut pair is nearly impossible. So I opted to buy a light wash pair of jeans at Gordman’s for $20, and the DIY ombré materials for around $10 (Everything but the dye and jeans can be found at your local Dollar Tree). My friend Taylor decided to join the fun and bought her own all white pair of jeans and two colors of dye.
Materials:
- Stirring/Mixing Tool Preferably Metal to prevent staining
- Measuring cup
- Bucket or Large Container
- Salt
- Rit Dye Liquid or Powder Form(I prefer the liquid)
- White or Light Wash Jeans
- Rubber Gloves
- Chlorine Bleach
- Paper Towels
- Old towel

You will also need access to a washing machine, hot water and cold water
If you are doing this at home you will also need to cover your floors, counters, basically anything that you do not want to be dyed with a plastic drop clop or tarp. I’m lucky enough to have access to a barn with washer, dryer and large basin sink all on concrete floors so I got to skip that step.
I opted for a single hue ombré and choose Rit Dye’s Cherry Red. Taylor wanted to mesh two colors together and choose Aquamarine and Fuchsia.
Step 1: Prewash your jeans, drying is not necessary as the pants need to be wet to accept the dye evenly. Cover your work surfaces and your own clothing.
Step 2: Fill your bucket with the HOT water, it should be steaming. Rit Dye recommends 140°F (Keep in mind you will still have to handle the water so don’t get it to a scalding temperature.) Add 1 cup of salt and stir until dissolved. The salt is like magic, it helps the dye stick. Leave 1-3” clearance at the top of your bucket.
Shake your liquid dye then pour into the water/salt mixture. Mix thoroughly. For single hue ombré, add ¼ of the liquid dye to the water. For two hue ombré you’ll mix each color in its own bucket full strength.
At this point you can use a clean paper towel to test your color. If you want a darker hue add more dye, if you want a lighter hue add more water.
*Rit Dye recommends adding a squirt of dish soap, I didn’t do this.
Step 3: For single hue ombré, decide if you want the tops to be dark or the bottom. I choose to have the top be light and fade to dark. If you are doing two hues decide which color is going on which end. Taylor wanted blue on top, and pink on the bottoms.
Single hue: Submerse the jeans in the dye leaving about 1” top out for a white to red effect. If you want light red to dark red submerse fully. Stir or move the jeans around in the dye to get even distribution for ten minutes.

Ring out excess dye and remove jeans from the bucket. Add another ¼ of liquid dye to the water. Place jeans back in the water leaving more of the top showing (25% out, 75% in dye). Stir or move the jeans for 10 more minutes.

Ring out excess dye and removed jeans. Add another ¼ of liquid dye the water. Place jeans back in the dye (50% out, 50% in dye). Stir or move the jeans for 10 minutes.
Ring out excess dye and remove jeans. Add the remainder of the liquid dye to the water and place the end in (75% out, 25% in dye). Stir or move the jeans for 10 minutes.

Ring out excess dye and rinse the jeans under warm water moving from the light end of the jeans to the dark end (if you try to go dark to light you’ll ruin the ombré because the dye will run backwards). Keep rinsing, changing the water temperature to cold until the water runs clear.
Double Hue: In Taylor’s case she decided to do 50/50 color, she submersed her jeans in the aquamarine from the belt loops to about the knee. The other half was submersed in the bucket of Fuchsia. She used the metal mixing spoon to pull the colors together in the center creating an awesome purple color. Soak the pants for 20-30 minutes depending on the level of color you want.

Ring out the excess dye.
Taylor wanted more purple so she dipped half of the pink portion into the blue for another 10 minutes.
Ring out the excess and rinse following the warm water to cool water method until it runs clear. It’s best in this case to do it color section by color section until you get a vast majority of the dye out then run the water from top to bottom or bottom to top.

*At this point you can use the Rit Dye Fixative following the dip dye method. I choose not to use the fixative.
Step 4: Hand wash with mild detergent and rinse with cold water.
Step 5: Line dry or put in the dryer with an old towel that you don’t mind getting stained with excess dye.

*Dye will likely stain your dryer, wipe down with warm water and bleach following removal of your jeans.
Step 6: Clean up! Bleach and hot water are your new best friends. The quicker you clean up dye spills the less likely it is to become permanent. Keep in mind that fiberglass and porcelain surfaces are most likely to retain the dye. Use stainless steel sinks and tools if you have them.
Care Instructions: Wash your jeans separately or with some old towels for the first few washes, they will still bleed dye, in cold water with mild detergent and dry like normal.

|

|
For other tips, tricks and techniques check out: Pumps and Iron (http://pumpsandiron.com/2012/06/14/diy-ombré-denim-dyeing/) , Babble (http://www.babble.com/style/easy-diy-ombré-jeans/)or Rit Dyes Website (https://www.ritstudio.com/)
Share your ombré and tie-dye finds with me on any social media outlet.
- Paige Morgan
Facebook: https://www.facebook.com/paige.morgan.9
Twitter: https://twitter.com/half_paige
Instagram: http://instagram.com/halfpaige
Online Portfolio: http://4paigemorgan.wordpress.com/


